DIY Mars Rover with Multiple Sensors and Wireless Camera for Exploration
Build your own DIY Mars Rover with multiple sensors and a wireless camera for exploration. Learn about robotics, navigation, and environmental monitoring.
If you're a robotics enthusiast or an aspiring engineer, building a DIY Mars Rover equipped with multiple sensors and a wireless camera could be an exciting challenge! This hands-on project allows you to create a small-scale, fully functional replica of a Mars Rover, capable of navigating diverse terrains, collecting environmental data, and providing live visual feedback through a wireless camera.
Not only will you enhance your programming and electronics skills, but you'll also learn about the practical applications of robotics and remote sensing technologies. Here's everything you need to know to get started!
Project Objectives
- Design & Build a Functional Model: Construct a Mars Rover that can explore and collect environmental data.
- Integrate Multiple Sensors: Monitor temperature, humidity, and distance to understand the rover's environment.
- Wireless Camera Setup: Stream real-time video to enhance remote control and exploration capabilities.
- Improve Programming Skills: Write control algorithms for the rover’s navigation and data collection.
- Promote STEM Interest: Inspire curiosity about robotics and space exploration through a hands-on project.
Key Features of the DIY Mars Rover
- Multi-Sensor Integration: Equipped with temperature, humidity, and distance sensors to mimic the functionality of real rovers.
- Wireless Camera: Provides live video streaming and remote control, perfect for real-time visual feedback.
- Efficient Motor System: Uses motor drivers and multiple motors to navigate diverse terrains.
- Autonomous Navigation: Programmed to navigate independently based on sensor input, enhancing skills in AI and automation.
- Customizable & Expandable: Build on this foundation by adding more sensors and features to advance the rover’s capabilities.
Applications
The DIY Mars Rover project isn’t just a fun hobby; it has real-world applications too! Here are some key areas where this project can be applied:
- STEM Education: Offers hands-on learning about robotics, sensor integration, and programming for students.
- Hobbyist Robotics: Great for enthusiasts looking to experiment with different sensors, wireless communication, and control algorithms.
- Remote Sensing: The rover’s autonomous navigation and data collection features can be used in environmental monitoring, hazard exploration, and mapping inaccessible areas.

The Working of the DIY Mars Rover
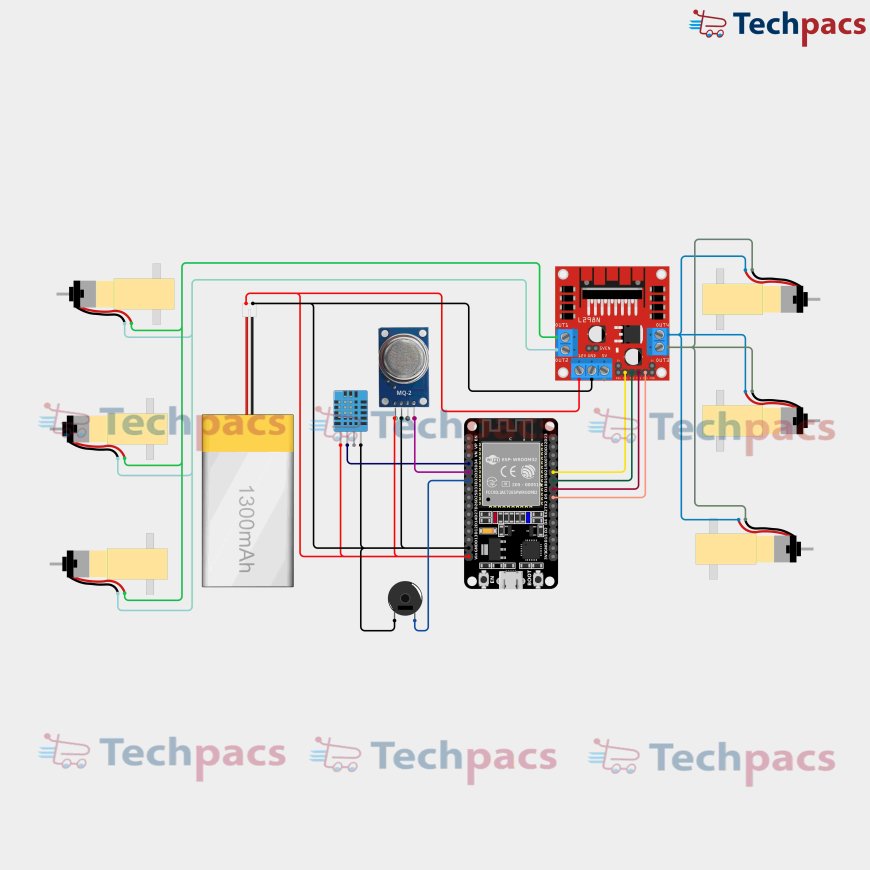
At the heart of this rover is the ESP32 microcontroller, which integrates all components, including motors, sensors, and the wireless camera. Let’s break it down step by step:
- Power Supply: A 1300mAh Li-Po battery powers all the components, ensuring long-lasting operation.
- Motor System: The rover uses four DC motors controlled via the L298N motor driver, which allows precise movements for navigating rough terrains.
- Sensors:
- Ultrasonic Sensor (HC-SR04): Detects obstacles and helps avoid collisions by measuring the distance to objects in front of the rover.
- DHT11 Sensor: Monitors temperature and humidity, providing environmental data.
- Wireless Camera: Streams live footage to a remote device via Wi-Fi, helping the operator navigate the rover and monitor its surroundings.
- Buzzer: Provides audio alerts when the rover detects obstacles or unusual environmental conditions.
With these components working together, the rover can autonomously navigate, collect environmental data, and provide a real-time video feed.
Modules Used in the DIY Mars Rover
- Power Supply Module:
- 1300mAh Li-Po Battery powers all components.
- Microcontroller Module:
- ESP32 integrates sensors and motors, and handles Wi-Fi communication.
- Motor Control Module:
- L298N Motor Driver controls DC motors for smooth movement and steering.
- Sensor Module:
- Ultrasonic Sensor and DHT11 monitor environmental factors.
- Wireless Camera Module:
- Streams live video back to the operator for remote control.
Components Used
- ESP32 Microcontroller: For processing sensor data, controlling motors, and managing wireless communication.
- 1300mAh Li-Po Battery: Ensures that the rover has enough power to run all its components.
- L298N Motor Driver: Controls the movement of the rover’s motors.
- DC Motors: Provide movement across various terrains.
- Ultrasonic Sensor (HC-SR04): Measures distance for obstacle detection.
- DHT11 Sensor: Monitors temperature and humidity.
- Buzzer: Alerts the operator to critical conditions.
Other Possible Projects Using the Mars Rover Kit
- Autonomous Obstacle Avoidance Robot: Build a robot that navigates independently by avoiding obstacles using sensors.
- Smart Home Surveillance Robot: Modify the rover into a home surveillance robot, streaming live video and sending alerts.
- Environmental Monitoring Rover: Add sensors for air quality, pollution levels, and other environmental data.
- Follow Me Robot: Create a robot that follows a person or object based on sensor data.
- Exploration Rover with Data Logging: Enhance your rover with GPS and data logging to explore unknown terrains and gather valuable data.
Conclusion
The DIY Mars Rover is more than just a fun project—it’s a gateway to learning about robotics, sensor technology, and remote exploration. Whether you’re a student, a hobbyist, or a space exploration enthusiast, building this rover offers valuable hands-on experience in the world of engineering and programming. So, grab your tools, get ready to explore, and start building your very own Mars Rover today!


